

Summary
In this lesson, students explore the field of forensic entomology by engaging in hands-on, reflective activities. After reviewing the life cycle of flies, students will act as forensic investigators and work through authentic case studies. Students will have a deeper understanding of forensic entomology, its processes, and its real-world applications in solving crimes.
Essential Question(s)
How do insects aid in forensic investigations?
Snapshot
Engage
Students review and activate prior knowledge about forensic entomology using an ABC Graffiti poster.
Explore
Students recall the life cycle of flies with a Card Sort.
Explain
Students review key concepts, complete guided notes, and apply newly learned skills to solve a model case study.
Extend
Students solve forensic case studies by collecting, analyzing, and interpreting data and evidence.
Extend 2 (Optional)
Students watch an additional ICAP video highlighting another career path related to forensic entomology.
Evaluate
Students synthesize information learned and complete a reflection activity.
Materials
ABC Graffiti handout (attached; one per group)
Case Cards (attached; laminate sets for student use)
Case Resources handout (attached; one set for group; see “Designing the Case Folders”)
Detective Notes handout (attached; one per student)
Designing the Case Folders handout (attached; teacher copy)
Guided Notes handout (attached; one per student)
Lesson Slides (attached)
Life Cycle Map handout (attached; one per group; see “Preparing the Lesson”)
Life Cycle Cards handout (attached; one set per group; see “Preparing the Lesson”)
Reflect & Discuss handout (attached; one per student)
Slide Answers (attached; teacher copy)
Markers (a different color per group)
Pen/Pencil
Pipe cleaners (see “Preparing the Lesson”)
Disposable gloves (optional)
Ruler (one per group)
Folders or large manila envelopes
Preparing the Lesson
30 Minute(s)
For the Explore
Print Life Cycle Map and Life Cycle Cards (one per group). Each page has two sets of cards; each group needs only one set.
Cut pipe cleaners to 16mm, 25mm, 31mm, and 34mm.
Laminate Map and Cards for durability (optional).
Store each set of Cards + cut pipe cleaners in a plastic bag per group.
For the Extend
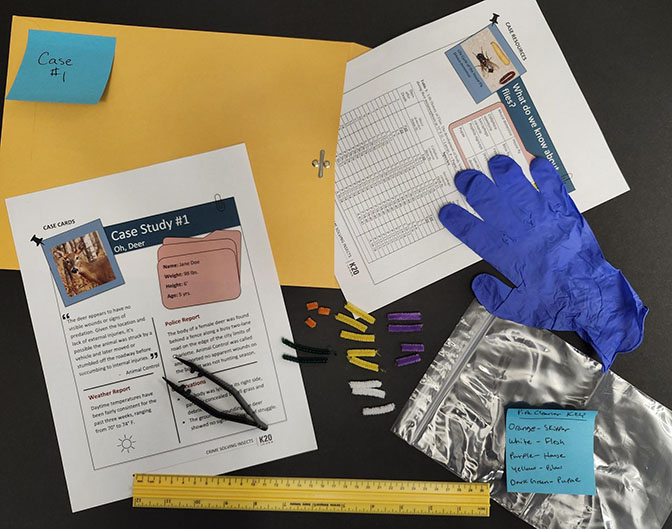
Create the “Case Folders” by using the Designing the Case Folders handout as a reference. Make multiple copies of “Case 1,” including one for yourself. Next, place one to two copies of each remaining case folder at three different stations around the room so that students can rotate through them.
Engage
15 Minute(s)
Use slides 2-4 to introduce the lesson title and state the objectives and the essential question. Slide 5 introduces students to the ABC Graffiti strategy. Divide the students into small groups and distribute one marker and one ABC Graffiti poster per station. Use slide 6 to focus the question and set each of the three one-minute timers for the three rounds. Groups are to fill in as many letters according to the prompt as they can before time is up. Then, they will take their marker and move as a group to the next poster and continue where the last group left off within the time allotted. Reset the timer on slide 6 each time the groups move to a new station.
Explore
25 Minute(s)
Place students into small groups and pass out the Life Cycle Map handout, the prepared sets of Life Cycle Cards with the cut pipe cleaners, and a ruler to each group.
Explain the Card Sort activity, slide 7, students match the cards to the life cycle stages of the Blow Fly. Display slide 8 and have students retrieve the pipe cleaners. Instruct students to measure and place the pipe cleaners (which represent a fly at each stage) on the space for “Size” and start the timer. Remind students that not all spaces will be filled. After the timer goes off, ask for some volunteers to make some guesses as to the size of some of the stages.
Display slide 9. Using the sizes and life cycle stages identified in the previous rounds, groups should infer the duration of each fly stage and place the "Round 3" cards in the "Time" space.
Once the timer goes off, pass out the Guided Notes handout to every student. Then, transition through slides 10-13 to review the answers to “Rounds 2 and 3” while students continue filling in the Guided Notes handout. Encourage them to rearrange their maps as needed. When explaining how adult flies lay their eggs on a carcass on slide 13, be sure to highlight how these openings are the easiest point of entry, which will be important later for the case studies they attempt.
Explain
60 Minute(s)
Slide 14 explains the role and responsibilities of a forensic entomologist. Students should continue to fill in their Guided Notes handout.
Move to slide 15 and introduce the I Notice, I Wonder strategy. Explain to students that they should add their reflections while watching the following two video clips to their Guided Notes handout. Transition to slide 16 and play the “Forensic Entomology” video clip. Next show slide 17 “How Entomologists Use Insects to Solve Crimes.”
Display slide 18 and have students continue filling in their Guided Notes handout. Advance to slide 19. Invite students to sketch the four stages of body decomposition using the Cognitive Comics instructional strategy. Explain that they should use the “Stages of Decomposition” section of the Guided Notes to depict the content visually. Encourage students to use an animal or human body as the main image. Once students are prepared, transition through the stages of decomposition with slides 20-23 in as much detail as needed. When reviewing the image of the fly life cycle, the stages appear clockwise from left as follows: eggs, larvae, pupae, and adult.
Transition through slides 24-26, reviewing which insects appear at each decomposition stage. Emphasize how their presence or absence helps forensic scientists determine PMI (post-mortem interval). For example, when scientists see the Hide Beetle, they know that the flies have already come and gone and that the body is in a late stage of decomposition.
Display slide 27 and explain to students that, after reviewing how insects are used in forensic entomology, they will now learn about a professional who works with insects as part of his job. Show the ICAP video “Crime Solving Insects with Michael Chism.”
In the video, Chism explains his career, which involves using Dermestid Beetles to clean skulls and carcasses, and describes how he entered this field. After the video, move to slide 28 and review the educational pathways students can pursue to apply what they are learning about forensic entomology to the career highlighted in the video. Click the links to see program requirements at Oklahoma universities.
Slide 29 reviews insect succession. The table on slide 30 depicts which insects appear at which stage of the body decomposition. Highlight that Blow Flies are the first to arrive, as this is relevant to the case studies. Slides 31-32 review other factors that impact a PMI (postmortem index).
Divide students into small groups and distribute “Case 1” folders (see the Designing the Case Folders handout). You will model “Case 1” for the class. Give each student a Detective Notes handout. Display slide 33 and allow students time to review the materials. Then, invite students to place everything to the side or center of their group making sure to keep the bag of “evidence” still sealed closed. Next, lead a discussion using the 3-slide questions discussing the model case study. Instruct students to take notes on the Guided Notes handout. Next, have students find their Case Resources handout from the folder and advance to slide 34. Facilitate a class discussion using the questions:
Using what we know, what can we learn from the table?
How does this help us solve the case?
Display slide 35 and have students read through the Case Card for “Case 1.” Have the students measure their evidence. Let them work through the questions with their group before asking for volunteers to answer the questions. Facilitate a classroom discussion to clear up any misconceptions. Then move to slide 36 and go over the answers.
Have students return all materials to their Case Folder and turn them in.
Extend
60 Minute(s)
Place students in small groups and display slide 37. Explain that they will be assigned to their first station/case and that they are only to rotate to the next station when instructed to. If needed, unhide slide 38 and provide more explicit reminders of how to use the Case Resources effectively. Move to slide 39 and instruct students to use all available resources to solve the cases. Start the 10-minute timer. Slide 40 introduces the second case, “Oh, Deer.” Slide 41 presents case #3, “Dandy’s Death,” and slide 42 presents case #4, “Porky’s Peril.”
When all groups have solved each of the remaining cases, transition through slides 43-45 to review the answers. For Case 3, consider temperature (84–86°F) and oleandrin when assessing Blow Fly development. Only temperature affects House and Flesh Flies.
Extend 2 (Optional)
10 Minute(s)
For students who are interested in careers in forensic science, particularly those involving skulls and bones, unhide slide 46 and show the ICAP video “Crime Solving Insects with Ashley Meerschaert.”
Evaluate
15 Minute(s)
Go to slide 47 and distribute the Reflect and Discuss handout. Students will answer questions individually, then share with an Elbow Partner, taking notes. After sharing, they can update responses if any changes have occurred. Invite volunteers to share reflections.
Optional Activity: Forensic Activities
Consider having students apply their forensic entomology knowledge and skills within a forensic case context. By stepping into the role of a forensic scientist, students can examine evidence, make comparisons, and draw conclusions using authentic investigative techniques. Of Maggots and Murder - Forensic Entomology Laboratory Kit and the Beginning Entomology Kit include cases and equipment that support this type of analysis and that reinforce a range of core skills essential to forensic science.
Resources
fearlessaggie. (2008, September 26). Forensic entomology. YouTube. https://www.youtube.com/watch?v=dntO3YANo18
Flinn Scientific. (n.d.). Beginning entomology and animal behavior laboratory kit for biology and life science. https://www.flinnsci.com/beginning-entomology-kit/fb1579/
K20 Center. (2021). 2-minute timer. YouTube. [video]. https://www.youtube.com/watch?v=HcEEAnwOt2c
K20 Center. (2021). 3-minute timer. YouTube. [video]. https://youtu.be/iISP02KPau0?feature=shared
K20 Center. (2021). 10-minute timer. YouTube. [video]. https://www.youtube.com/watch?v=9gy-1Z2Sa-c
K20 Center. (n.d.). ABC graffiti. Strategies. https://learn.k20center.ou.edu/strategy/96
K20 Center. (n.d.). Card sort. Strategies. https://learn.k20center.ou.edu/strategy/147
K20 Center. (n.d.). Cognitive comics. Strategies. https://learn.k20center.ou.edu/strategy/198
K20 Center. (n.d.). Elbow partners. Strategies. https://learn.k20center.ou.edu/strategy/116
K20 Center. (n.d.). I notice, I wonder. Strategies. https://learn.k20center.ou.edu/strategy/180
K20 Center. (2025, February 19). K20 ICAP - Crime solving insects with Ashley Meerschaert. [Video]. YouTube. https://www.youtube.com/watch?v=MyJAvzPElW4
K20 Center. (2025, February 19). K20 ICAP - Crime solving insects with Michael Chism. [Video]. YouTube. https://www.youtube.com/watch?v=ieiBSQyKEoo
Tynan, P. (2020). Effects of body size on the rate of decomposition in the UK: Measuring total body score and percentage mass change in Sus scrofa. [pig image]. Research Gate. https://doi.org/10.13140/RG.2.2.31227.54561
Wired. (2022, Oct. 21). How entomologists use insects to solve crimes. YouTube. [video]. https://youtu.be/j8PoWlQkduA?feature=shared