

Summary
During this lesson, students are introduced to the significance of fossils in understanding past living organisms, gathering evidence about prehistoric life, and providing valuable insights into the Earth's historical environment and its transformations over time. As students progress through Discovery Stations, they engage in making observations and drawing inferences from the fossil specimens. Students then explore a range of informative books that cover topics such as fossil discoveries, evolving landscapes, bones, rocks, and paleontologists. Small groups of students create Frayer model posters based on the knowledge they acquired from the books and discussions.
Essential Question(s)
How do fossils help to explain changes in Earth’s surface over time? What can models and fossils tell us about Earth’s early organisms and environments?
Snapshot
Engage
Students look at four aerial photographs capturing the same area, find differences between the pictures, and try to place them in chronological order.
Explore
Students move through Discovery Stations where they observe and explore specimens from the Sam Noble Museum Discovery kit. In lieu of the Discovery kit specimens, photos are attached and can be printed.
Explain
Students populate an "I Notice, I Wonder" T-Chart by sharing and recording their observations and questions on the chart.
Extend
Students are divided into groups, and each group is assigned a different book. After reading about fossil discoveries, evolving landscapes, bones, rocks, and paleontologists, each group will design a poster highlighting the significant concepts from the books, focusing specifically on rock formations and fossil discoveries.
Evaluate
Student groups construct a puzzle that creates a timeline that shows change over time and discusses the results of the completed puzzles while revisiting the essential questions.
Materials
Engage:
6 Sets of printed Aerial photos (attached; 1 set per group; each set has 4 aerial photos of the same area but different decades)
Aerial Photo Date labels (attached)
Google Earth on Computer
Explore:
Fossil specimens (or the attached photos of the specimens)
Task cards for Stations (attached as a PPT, run off two slides per page, and cut apart )
Teacher description of all the stations (attached; 1 copy for the teacher)
Discovery Notebooks (attached, English and Spanish versions included)
Play-dough or modeling clay
Hand Lenses, pencils, small metric rulers, sticky notes
Chart of Geologic Time (optional)
Explain:
Chart paper
Extend:
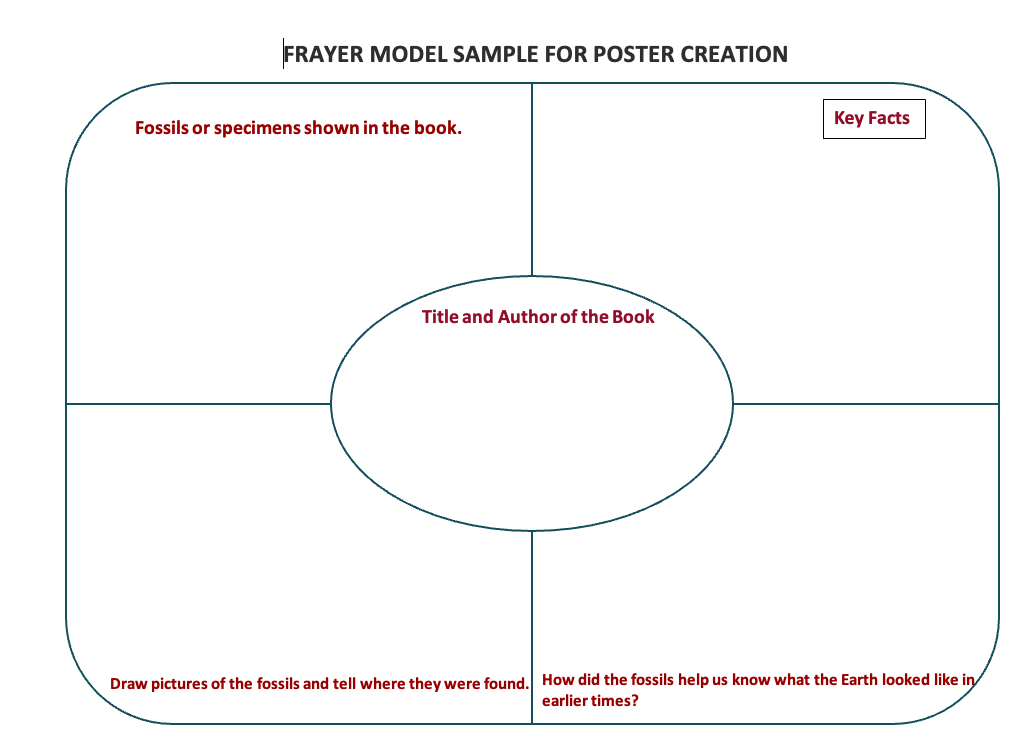
Frayer Model student template (attached)
Frayer Model example (attached; 1 copy for the teacher)
Books:
Journal of a Fossil Hunter by Louise and Richard Spilsbury
Rock Man vs. Weather Man (The Magic School Bus Rides Again) by Samantha Brooke
Dinosaur Lady: The Daring Discoveries of Mary Anning: The First Paleontologist by Linda Skers
Curious about Fossils by Kate Waters; Fossils for Kids by Ashley Hall (this is a longer book so you may want to read only sections)
Evaluate:
Fossils Puzzle (attached; 1 puzzle per group; will need to be printed and cut out)
Baggies for Puzzle pieces
Engage
30 Minute(s)
Start the lesson by asking students:
How do we know that the Earth didn't always look like it does now?
Can you think of any evidence to support your answer?
Begin the next activity using the Card Matching strategy. Give each group of students a set of the four attached Aerial Photos. Have students place the pictures in order from what they think is the oldest to the most recent. Briefly discuss what details in the photos lead them to place the landscapes in that order.
Then, tape the attached Aerial Photo Date Label cards to the board chronologically. With the students' help, place one set of landscape photos in the correct order. You might start with the most recent, then the oldest, and move along as the class notices the changes. When finished, have the students re-sort their cards by looking closely at the details in the photos.
Guiding questions to ask students:
What could have caused these changes in the landscapes?
How many years passed from the first photo to the most recent?
Is this considered a long time for the Earth?
Go to Google Earth Timelapse and show the Padma River, which shows a distinct change over time. Additionally, you can also show them other places.
Ask students: "What do you think these areas might have looked like 3 million years ago? Do we have any ideas?”
Say to students: “We have aerial photos to look at to see what the surface of the Earth looks like over a short amount of time. Now let’s think about how scientists can tell what the land was like long ago when no photos were available.”
This is a thinking time for students. They do not need to come up with the correct answer but invite them to brainstorm possible ideas. The question will be discussed and addressed throughout the lesson.
Explore
60 Minute(s)
Give each student a copy of the attached Discovery Notebook. Place the specimens, hand lenses, and corresponding task cards at different stations in the room. Divide students into groups.
Students should move from one station to the next. They do not need to visit the stations in numerical order, but they should pay attention to the page they use in their notebooks.
Explain
40 Minute(s)
To help facilitate the discussion of the Discovery Stations, create a T-chart on the board with the labels “I Notice” and “I Wonder” per the I Notice, I Wonder instructional strategy.
Assign each group one Discovery Station to focus on. Have each group discuss their observations. Next, give each group four large sticky notes. Have the groups write three “notices,” one on each sticky note and one "I Wonder" on their fourth sticky note.
Each group reads their observations and wonderings aloud and places the sticky notes in the appropriate column on the "I Notice" and "I Wonder" chart. The "I Wonder" column becomes the driving question board.
Questions to drive more discussion:
Were some of the specimens older than others? How do you know?
Which specimen was the oldest, and which was the youngest?
Could you tell what the animal looked like or how it moved from the specimen?
Could you tell what it ate or how it escaped from predators?
What evidence supports the ideas we have about prehistoric organisms?
Do we know what its environment looked like when it was found as a fossil?
Could you tell where it lived when it was alive?
Extend
60 Minute(s)
There are a wide variety of books to choose from. Check your library for the following titles, or if you have the Sam Noble Discovery kit, these are in the kit.
Journal of a Fossil Hunter by authors Louise and Richard Spilsbury
Rock Man vs. WeatherMan (The Magic School Bus Rides Again) by Samantha Brooke
Dinosaur Lady: The Daring Discoveries of Mary Anning, the First Paleontologist by Linda Skers
Curious about Fossils by Kate Waters
Fossils for Kids by Ashley Hall (this is a longer book so you may want to read only sections)
Divide your class into groups and have each group read one of the books. Each group then creates an infographic or poster following the format of the attached Frayer Model Sample. This attachment uses the Frayer Model strategy.
Have your class participate in a Gallery Walk to review everyone's posters. Then, have a class discussion to let students share any other surprising or interesting information. Finally, revisit the questions posted on the "I Wonder" chart and ask students if they now have information to help answer some of the questions. Record these responses on the chart.
You may have to guide students by posing additional questions to continue the conversation. Some possible questions are listed here.
What can fossils tell us about life and environments long ago?
What kinds of plants and animals lived in a specific place long ago?
How did different species change or adapt over many years?
What was the variety of living things like in ancient habitats?
How did something like the weather and where they lived affect the plants and animals?
Evaluate
40 Minute(s)
Distribute a puzzle bag to each group of students. The puzzle consists of the attached Fossils Puzzle pieces displaying dates, landscape photos, and specimens. Each group will arrange their puzzle pieces to create a timeline, illustrating the progression of change over time. Allow the students ample time to engage in discussions within their groups, exploring the significance of the timeline depicted in the puzzle.
Afterward, students should turn to the final page of their Discovery Notebook and use their own words to explain the answers to the essential questions. They should support their responses with evidence from the puzzle, their observations and discussions about the fossils, and the information they learned from the books.
Opportunities for Advanced and Gifted Learners
Option 1: Encourage your students to explore various paleontology sites or take virtual tours of Natural History Museums to discover what aspects of Earth's changes might interest them. Here are some questions that could ignite their curiosity and inspire them to pursue a research project becoming experts in the classroom:
What types of fossils, if any, can be found in the area where you live?
Are there certain places on Earth that have more fossils than others? Why?
How did dinosaurs adapt to their environments?
What caused the extinction of the dinosaurs?
How have plants evolved over time?
What can fossils tell us about ancient marine life?
What geological forces shape the formation of mountains and valleys?
How do fossils provide clues about the Earth's past climates?
Option 2: Have students explore Shark-Tooth Hill in California. Then, have students revisit the focus questions and answer them with information about Shark-Tooth Hill. By exploring these questions and conducting research, students can delve into topics that capture their interest and become knowledgeable experts on specific aspects of Earth's changes.
Resources
Sam Noble Museum. (n.d.). Discovery Kits. https://samnoblemuseum.ou.edu/education-2/discovery-kits/
Paleontology Definition and Examples. (2018). Geology Science. Retrieved June 7, 2023 from https://geologyscience.com/category/geology-branches/paleontology/
K20 Center. (n.d.). Card Matching. https://learn.k20center.ou.edu/strategy/1837
K20 Center. (n.d.). I notice, I wonder. Strategies. https://learn.k20center.ou.edu/strategy/180
K20 Center. (n.d.). Gallery Walk https://learn.k20center.ou.edu/strategy/118
K20 Center. (n.d.). Frayer Model https://learn.k20center.ou.edu/strategy/126
Atanassova, V. (2016). File:Plovdiv Museum of Natural History - Fossil exhibition - Metacanthina.jpg [Photograph]. https://commons.wikimedia.org/w/index.php?curid=56012841
Video: Piecing Together Fossil Puzzles,NPS.gov. Dinosaur National Monument