
Summary
Students will explore vectors using properties of physics as they pertain to motion.
Essential Question(s)
Can two forces act on one object at the same time, and if so, what is the resulting movement?
Snapshot
Engage
A large coordinate plane on the floor with a box at the origin and red X marks at 4 coordinate points intrigue students as they enter.
Explore
Students explore different ways to apply forces to a box to create movement and work together to brainstorm different ways to get from the origin to each point.
Explain
Students use properties of triangles to determine the resulting distance of the movement by taking into account two perpendicular vectors. Students also explore the use of true bearing to communicate the direction of each vector and the resultant vector.
Extend
Students continue discussion of direction to include quadrant bearing and apply this knowledge to street maps and flight navigation.
Evaluate
Students calculate the magnitude and direction of all resultant vectors from the origin.
Materials
Large tote filled with heavy/stable objects
Masking tape
Sharpie
Red electrical tape
4 square pieces of blue paper or tape (about 3" x 3")
Move-It! and Move-It! Extend handouts (attached)
Engage
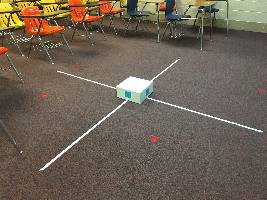
See image below for setup instructions:

On a whiteboard in the classroom write "You've got to Move It, Move It!"
Create coordinate plane on the floor with masking tape. The size should be approximately 4' x 4' with 1-foot increments. Use compass headings if at all possible.
Place a heavy box or tote on the origin of the plane. Mark the center of each side with a blue square (about 3" x 3").
Place a red "X" on the floor at the positions (-2, 3), (1, 4), (3, -4), (-2, -2).
Explore
When students enter the classroom, draw their attention to the box in the middle of the room.
Ask, "Is the box in the room moving?" Students should note that the box is not moving. You may need to clarify that we are calculating movement in reference to the floor.
Ask, "Are there any forces acting on the box?" Students could refer to gravity.
Ask, "In what direction is the force of gravity being applied?" Students should answer with "down" or "toward the center of the Earth."
Ask, "What is keeping the box from moving down toward the center of the Earth?" Students should answer with "the floor."
Pass out the Move-It! handout. Working in groups of 2 to 3, students will label the coordinate plane, the 4 red X locations, compass directions, and common true bearing degrees for the 4 axes.
Have groups work together to determine how to get the box from the origin to each of the red Xs using only N, S, E, or W movements—in other words, no diagonal movements. Explain that the box can only receive a force at one of the 4 blue squares on the sides. The motion must be perpendicular to the box itself, resulting in a straight-line motion.
If the red X is located at (-2, 3) the box should move left 2 feet and then up 3 feet.
Ask for a volunteer to move the box from the origin to the first point (-2, 3). If the student struggles, let their group guide them and troubleshoot together.
Repeat for the remaining 3 points. Have groups record directions on worksheet.
Ask the class if this is the most direct route to the final point? It is not, the student can move the box in a straight line to the final point.
Have the students draw this direct route on their coordinate plane.
How can the student move the box directly to the final point? Have the class brainstorm.
The goal is for the students to determine that if they apply both forces at the same time, the box will move along the diagonal.
Ask for a second volunteer. Have each of the two volunteers apply a force at one of the 4 blue squares on the box to result in the final location.
This may take several attempts for the students to get the forces to work together so the path is fairly straight and the final location is at (-2, 3).
Ask groups to draw the diagonal movement on their "Move-It! Worksheets" for each of the 4 points.
Explain
Ask students to explore the amount of force that each participant applied. Who applied more force? The student moving along the x-axis or the student moving along the y-axis?
The student who moved the box farther had to apply more force in the same amount of time to move 3 feet while the student who only had to move the box 2 feet applied less force.
Explain that the two initial movements are considered vectors. Each vector has a direction and a magnitude. If we combine both vectors simultaneously (when both students were applying force), we can achieve the same overall motion as the two initial vectors individually.
This is called the resultant vector.
Explain that in physics we call these vector forces. Vector quantities are quantities that possess both magnitude and direction. A force has both magnitude and direction, therefore: Force is a vector quantity and its units are newtons, N. Forces can cause motion; alternatively, forces can act to keep an object at rest.
For this experiment, there was an applied a vector force with a magnitude of 2 feet and a direction of 270 degrees as well as a second vector force with a magnitude of 3 feet and a direction of 000 degrees.
Have students read one or both of the following websites about Newton's first law of motion:
Extend
We can now apply what we know about right triangles to determine the direction and magnitude of the resultant vector.
Hand out the Move-It! Extend handout and ask students to determine the resultant vector for the additional points on the coordinate plane.
Students will use Pythagorean theorem to determine the magnitude (length) of the resultant vector.
Have students calculate the true bearing using the angle from true north, clockwise, to the resultant vector.
Give students a map of the state of Oklahoma. Using compass settings and their current city as the origin, have students map out directions to another city. Use miles as the magnitude and compass settings as the direction. Have them determine the initial vectors and then the resultant vector.

Evaluate
Students should use prior knowledge of trigonometry to calculate the direction and magnitude of each resultant vector. Complete the Move-It! Extend handout.
Resources
KhanAcademy. (2017). What is Newton’s first law? Retrieved from https://www.khanacademy.org/science/physics/forces-newtons-laws/newtons-laws-of-motion/a/what-is-newtons-first-law
The Physics Classroom. (2017). Newton’s first law. Retrieved from http://www.physicsclassroom.com/class/newtlaws/Lesson-1/Newton-s-First-Law