

Summary
Through digital storytelling, students will create projects that showcase creativity, teamwork, and writing across the curriculum. This lesson engages teachers in using a green screen, the Do Ink app, and a movie editing application like iMovie to transport them to the world of students reporting on projects like morning announcements to historical reports to book reviews. This lesson includes optional modifications for distance learning. Resources for use in Google Classroom are included.
Essential Question(s)
What makes good storytelling for an audience?
Snapshot
Engage
Participants will create an abstract or concrete visual of the "best part" of their school as a warm-up for digital storytelling.
Explore
Participants will explore the digital storytelling process and then brainstorm the beginnings of their own digital storytelling storyboard.
Explain
Participants will collect photos and video related to their chosen digital storytelling topic to import into a green screen project. A scavenger hunt of the green screen app, Do Ink, will be done collaboratively.
Extend
Participants can extend their green screen projects by importing them them into iMovie for additional transitions and production effects.
Evaluate
Participants will share their collaboration and production to the whole group. For student productions, the evaluation and sharing process will differ depending on the theme chosen.
Materials
Green Screen (bought or made)
Do Ink app
iMovie
iPad
Computer
WiFi or Internet access
Pencil or pen
Lesson Slides (attached)
Do Ink Scavenger Hunt (attached; one per student)
Mapping a Story with Prewriting (attached; one per student)
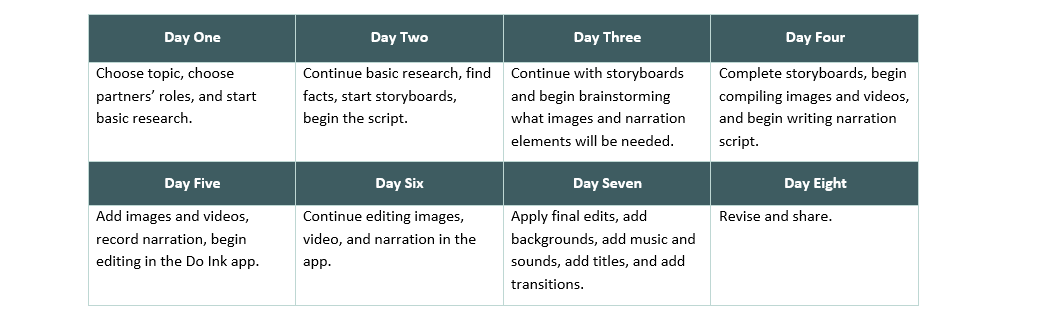
Sample Green Screen Production Schedule (attached; optional)
Engage
Use the attached Lesson Slides to follow along with the lesson. Begin by displaying slide 3, which shows the following question: "What is the best part of your school?" Consider having students draw their answers on paper or using a Web 2.0 tool like AutoDraw (this is linked on the slide). You can also ask students to write out an answer instead.
When students have responded to the prompt either through writing or drawing, ask volunteers to share what they've come up with.
Display slide 4 and share the essential question with your students: What makes good storytelling for an audience?
Display slide 5 and share the lesson's learning objectives with students: After this lesson, we will be able to 1) create projects that showcase creativity, teamwork, and writing across the curriculum, and 2) use a green screen and the Do Ink app to report on a project.
Explore
Transition to slide 6, and ask students what they think digital storytelling is and how they can integrate it into their work. Allow them time to discuss with an Elbow Partner before sharing out with the class.
Move to slide 7 and share with your students the steps in the digital storytelling process. Students should follow these steps, whether creating morning announcements or other productions:
Select a topic.
Research the content.
Write the script or create a storyboard.
Collect images and videos that enhance and tell the story wanting to be told.
Import and arrange the images (using tech tools like Do Ink and iMovie).
Insert narration, audio, and/or music.
Select the way that this story can be shared and who it will be shared with.
Display slide 8 and inform your students that, in addition to understanding the digital storytelling process, a strong topic must also be chosen. This topic should be one that captivates the attention of the creator (students) and the audience (other students, parents, etc.). These topics can range from the best part of school to classroom routines to historical figures. Topics may also be part of a larger project, like proposing a solution to a real-world school problem.
Pass out a copy of the attached Mapping a Story With Prewriting template to each student. This handout asks students the following questions: What is going to happen in your digital story? Who will need to be involved? Where will it take place?
Display slide 9 and have your students partner up. Students should use their handouts to establish their digital storytelling topic, as well as the steps needed to outline a plan for their production. Consider integrating the Storyboarding strategy and allowing students to illustrate each step needed for their outline.
Once students have chosen their topics and understand the process needed to produce their digital stories, invite students to begin working with Green Screen By Do Ink app. The following activity is an engaging way to keep students active as they collect the material needed for their green screen production.
Guide students through the following steps. Students should:
Find a partner and establish a topic.
Create a quick 30-second video with a partner in front of their green screen.
Take a few pictures that symbolize their topic. Some pictures should be in front of a green screen, and some without.
Get creative and have fun! Students should remember to use the events brainstormed on their storyboards to stick to their outline.
Give students time to take their pictures—at least 20 minutes. Depending on the space available, they might leave the classroom to collect images in a different setting.
Explain
Once students have returned from collecting their image content for their green screen video, invite them to work with their partners to get familiarized with the Do Ink app. Display slide 10 and inform your students that they will be completing a scavenger hunt to identify and explore key features in the Do Ink application. Make sure students download the Green Screen by Do Ink app to their devices before they begin. Pass out a copy of the attached Do Ink Scavenger Hunt handout. Give students the following directions:
With your partner, use the provided checklist to identify and explore key features of the application.
Make sure to ask questions along the way!
As you work through the list, upload the videos and pictures you took into Do Ink.
As students work through the list, they should create their Do Ink videos step-by-step.
Extend
It is possible and effective for your students to create and produce a green screen video using only the Do Ink app. However, to take it a step further and broaden your students’ production abilities, consider having student import their Do Ink files into iMovie (on iPads) and add more sophisticated narration, transitions, and effects. Display slide 11 and share the steps for students to follow if using iMovie. Students should do the following:
Open iMovie.
Choose “New Project.”
Import their media from Do Ink into iMovie.
Record a script, using their storyboard template as an outline and guide.
Add effects and background sound.
Export to their camera roll to share it with an audience.
Ask questions as needed.
If using iMovie, be aware of the following:
If a student erases a picture from their iPad’s camera roll, it will also disappear from their iMovie. The iMovie must be saved to their camera roll to avoid losing material.
YouTube videos cannot be used.
It is much easier for students to collect their videos and pictures before creating their iMovie.
Evaluate
Display slide 12 and invite students to show and explain their collaboration and digital storytelling production. Depending on the initial theme for this project (morning announcements, book reports, historical figures), the evaluation process will vary.
Resources
K20 Center. (n.d.). Elbow Partners. Strategies. https://learn.k20center.ou.edu/strategy/116
K20 Center. (n.d.). Storyboarding. Strategies. https://learn.k20center.ou.edu/strategy/79
K20 Center. (n.d.). Seesaw. Tech Tools. https://learn.k20center.ou.edu/tech-tool/671
K20 Center. (n.d.). Google Classroom. Tech Tools. https://learn.k20center.ou.edu/tech-tool/628
K20 Center. (n.d.). Green Screen By Do Ink. Tech Tools. https://learn.k20center.ou.edu/tech-tool/632
K20 Center. (n.d.). iMovie. Tech Tools. https://learn.k20center.ou.edu/tech-tool/636