

Summary
In this lesson, students learn how geological time can be predicted by examining strata layers and fossil evidence. They explore different rock strata and fossils, making comparisons and inferences. Using provided specimens, students determine which species existed during various time periods in Earth's past and identify the characteristics of each layer. By analyzing fossils and rock strata, students create a visual timeline of environmental changes over geological time and discuss the possible geological events that influenced these changes.
Snapshot
Engage: Students participate in a magnetic statements activity about rock strata and relative dating.
Explore: Students move through Discovery stations. At each station, they observe and explore specimens from the Sam Noble Museum Discovery Kit. If you don’t have the Discovery Kit, photos of the specimens are attached and can be printed.
Explain: Students read and discuss information about what kinds of events cause different kinds of rock layers and features. Students then build their own block diagrams using various materials representing geologic events in earth’s history.
Explain Part II: Students discuss and populate an "I Notice, I Wonder" T-Chart based on the information they learned through the Discovery Stations.
Extend: Students compare fossils and rock strata to infer characteristics of earth’s surface at various times in the past and the geologic events that could have occurred.
Evaluate: Working in small groups, students create visual representations of geologic time by applying what they have learned in this lesson. Students individually answer the essential question.
Materials
Engage
15 Minute(s)
Print and then place the following five magnetic statements in its own section of the room:
“I think the younger layers are always at the top.”
“I think the youngest layers are always at the bottom.”
“I think the youngest layers are sometimes at the top.”
“I think the oldest layers are usually in the center.”
“I think all rock layers are the same age; the layers are just different types of rock.”
Ask students to take a stance by standing next to the statement that they believe reflects their views, or the statement they are “most attracted to.” Have the students gather around each statement and discuss the reasoning for their choice with the other classmates standing with them. After their discussion, have each group choose a spokesperson to share out their stance and reasoning to the class.
Ask students to move again, but this time to the statement that repels them the most. Have them discuss within their group why. Choose a spokesperson to share out.
Explore
45 Minute(s)
Give each student a copy of the Discovery Notebook.
Place the specimens, hand lenses, and corresponding task cards at different stations in the room.
Divide students into groups.
Students should move from one station to the next. They do not need to visit the stations in numerical order, but they should pay attention to what page they use in their notebooks.
Explain Part I
55 Minute(s)
If you have not introduced the essential questions, you will want to do that now.
Essential Questions:
How do rock strata and fossils help scientists organize geologic time?
How do rocks tell the story of Earth?
Give students a copy of the attached Exploring Earth’s History and have the students use the Cus and Discuss strategy as they work through the article.
Next, during the class discussion make an Anchor Chart to display the new vocabulary students share from the article. (Words they Circled.). You should also add any crucial words that the students do not offer.
Then, have students work in groups sharing the main ideas they Starred. Continue with the discussion by having each group share one of the main ideas. You may want to start a digital Anchor Chart such as Padlet to have students write their ideas in a collaborative space. Continue the discussion with the Underlined details.
You want to be sure your students understand what kinds of events cause different kinds of rock layers and features.
Have them consider the following:
Intrusion occurs when magma moves to the surface or when volcanoes erupt.
Faults are due to earthquakes.
Folding occurs when mountains form.
Provide groups of students with the materials to make block diagrams: colored sand or gravel, tag or cardboard, paper, and markers. Students should now be ready to build their own block models to represent the geologic events in Earth’s history. Have students explain their model in small groups. Display with labels in the classroom, if possible.
Explain Part II
40 Minute(s)
To help facilitate the discussion of the Discovery Stations, create a T-chart on the board with the labels "I Notice" and "I Wonder."
Assign each group one Discovery station to focus on. Have each group discuss their observations. Next, give each group four large sticky notes. Have the groups write three “notices,” one on each sticky note and one "I Wonder" on their fourth sticky note.
Each group reads their observations and wonderings aloud and places the sticky notes in the appropriate column on the "I Notice" and "I Wonder" chart. The "I Wonder" column becomes the driving question board.
Questions to drive more discussion:
Were some of the specimens older than others? How do you know?
Which specimen was the oldest and which was the youngest?
Could you tell what the animal looked like or how it moved from the specimen?
Could you tell what it ate or how it escaped from predators?
What evidence supports the ideas we have about prehistoric organisms?
Do we know what its environment looked like when it was found as a fossil?
Could you tell where it lived when it was alive?
Extend
40 Minute(s)
Provide students with fossils or fossil photos and the attached Extend Reference Cards. Ask students to observe the fossils from different time periods and what kind of organisms occur in each time period. Students should match the fossil specimens to the pictures of the organisms. The fossils needed are as follows:
Deinonychus toe
Ichthyosaur vertebrae
Tenontosaurus femur
Machairodus jaw
Cardiocephalus
Captorhinus
Borophagus
Teleoceras jaw
Coral
Trilobite
Ammonite
Have students order the fossils across geologic time and describe:
How might the environment have changed over time?
What major events and/or effects would have to occur to result in the change in fossils? (e.g., Oceans would have to recede to allow terrestrial plants and animals to exist; if terrestrial fossils suddenly disappear from the fossil record leaving only aquatic ones it suggests an expansion of aquatic environments or something catastrophic on land.)
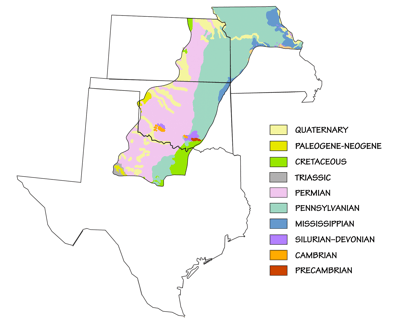
Next, have students compare their fossils to the map of the Central Lowland (attached) and determine whether any of the fossils come from the same geologic time as the rocks found in Oklahoma. Ask them to identify what time period most of our rocks/fossils come from in Oklahoma.
Provide students with the following:
A stratigraph (attached) of the Chickasaw National Recreation Area which is in the Oklahoma Arbuckle Mountains and part of the Central Lowland.
The list of fossils (attached) that can be found in those rock layers.
Ask students to describe the environment they might expect the Chickasaw National Recreation Area to have had during this time in geological history. As a group, discuss how the rocks and fossils found in Oklahoma fit into the progression of organisms and environmental changes over time.
Evaluate
20 Minute(s)
Place students into groups and assign them a geologic time frame and/or set of fossils.
Based on the fossils found during that time, students will illustrate predictions or find a picture of what the environment would have looked like during that particular time period.
As student groups finish, have them help you arrange the pictures/drawings in geological time order and then give the class a few minutes to look over the full timeline of environments.
Have a class discussion about the environmental changes and what geological events would have contributed to those changes. Then ask students to explain why the fossil record and rock strata cannot give us exact time periods that events happened and environments existed.
Finally, have students individually complete the following Exit ticket by answering the essential question:
How do rock strata and fossils help scientists organize geologic time?
Opportunities for Additional Study
30 Minute(s)
Find out what your students find interesting and may excite their passion to learn more about how the Earth changes. Let them look through some paleontology sites or Natural History Museum virtual tours. The following questions might ignite a spark of interest for their project.
What types of fossils, if any, can be found in the area where you live?
Are there certain places on Earth that have more fossils than others? Why?
After exploring Shark-Tooth Hill in California https://www.fossilguy.com/sites/, have students revisit the focus questions and answer them with information about Shark-Tooth Hill.
Resources
Geology Science. (n.d.) Paleontology definition and examples. https://geologyscience.com/category/geology-branches/paleontology/
Johnson, K. S. and Luza, K. V. (2008). Earth science and minerals resources of Oklahoma. Oklahoma Geological Survey:
Educational Publication 9. http://ogs.ou.edu/docs/educationalpublications/EP9.pdf
K20 Center. (n.d.) Exit tickets. Strategies. https://learn.k20center.ou.edu/strategy/125
K20 Center. (n.d.) Cus and discuss. Strategies. https://learn.k20center.ou.edu/strategy/162
K20 Center. (n.d.) Padlet. Tech Tools. https://learn.k20center.ou.edu/tech-tool/1077
K20 Center (n.d.) I notice, I wonder. Strategies. https://learn.k20center.ou.edu/strategy/180
K20 Center. (n.d.) Anchor charts. Strategies. https://learn.k20center.ou.edu/strategy/58
National Park Service. (n.d.) Chickasaw national recreation area. Geologic Resources Inventory Report. https://irma.nps.gov/DataStore/DownloadFile/527524
Photos of Real Specimens: Sam Noble Museum of Natural History: https://samnoblemuseum.ou.edu/
Sam Noble Museum of Natural History: https://samnoblemuseum.ou.edu/